Sending a Message
Last updated: July 17, 2025
This guide covers everything you need to know about sending messages through Yourco, from basic message composition to advanced targeting options.
Here is a quick video demonstrating Yourco Message Sending
How Message Sending Works
Yourco's messaging system allows Admins and Managers to send targeted messages to employees via SMS. The system uses a two-step targeting process:
Step 1: Select Locations
First, choose which locations you want to target. This filters the available recipients to only those employees working at the selected locations.
If you don't utilize locations, this field will not appear.
Step 2: Select Recipients
After selecting locations, choose specific recipients from the filtered list. You can target individuals, departments, tags, or "All Employees" at the location(s) you selected in Step 1.
Message Types
Messages can include:
Text content with support for variables (type
{within the message field to see available options)Up to 1 resource (File, Poll, etc...)
Pro tip: Messages can also be translated into your employee's preferred language. Check out our article on Automated Language Translation.
Sending an All Employee Message
To send a message to all employees across all locations:
Open the Messenger from the main navigation
Click the "+" button in the bottom right hand corner to create a new message
Select Locations:
Choose "All Locations" from the dropdown
Select Recipients:
Choose "All Employees" from the recipient options
Compose your message in the text field
Review recipient count displayed below the recipients field
Click "Send Messages" to deliver
Note: The system will show you exactly how many employees will receive the message before you send it.
Important: Yourco sends individual messages to each recipient, not group messages.
What This Means:
Each employee receives their own private message - they cannot see who else received it
No group chat is created - employees cannot reply to each other.
Each conversation is one-on-one between the employee and your organization
Privacy is maintained - employee responses are only visible to managers and admins who have access to that employee
Sending a Message to a Single Employee
To send a message to a specific individual:
Open the Messenger
Click the "+" button in the bottom right hand corner
Select the appropriate location where the employee works (If you don't know where the employee works, select "All Locations")
Search and select the specific employee from the recipients list
Compose your message
Send the message
Alternative Method: Direct Reply
You can also send a message to a single employee by:
Opening an existing conversation with that employee using the conversation panel.
Click the reply button (arrow icon) in the bottom-right corner
This automatically sets up the message form with that employee as the recipient
Targeting Employees by Location
The location system allows you to target employees based on where they work:
How Location Targeting Works:
Primary Filter: Locations act as the first filter for recipients
Cascading Selection: Only employees, departments, and tags at selected locations appear in the recipients list
Multiple Locations: You can select multiple locations to target employees across different sites
Location Options:
Specific Locations: Target employees at individual locations (e.g., "Chicago Plant", "Warehouse A")
"All Locations": Target employees across all company locations
Departments, Tags, and System Groups
Yourco provides several ways to organize and target your employees:
Departments
Purpose: Organize employees by functional groups (e.g., "Manufacturing", "Engineering", "HR")
Usage: Target entire departments with role-specific communications
Tags
Purpose: Create custom groupings for specific attributes or roles
Usage: Target employees with specific skills, certifications, or characteristics
Example: Send safety reminders to employees tagged with "Forklift Certified"
System Groups
Special predefined groups that provide broad targeting options:
"All Employees"
Targets every employee in your organization
Respects location filters if specified
Most commonly used for company-wide announcements
"All Locations"
When selected as a location filter, makes all employees across all locations available as recipients
Used for organization-wide targeting
Combining Targeting Options:
You can mix and match these options. For example:
Location: "Chicago Plant" + Recipients: "Warehouse" = Only Warehouse employees at the Chicago Plant
Location: "All Locations" + Recipients: "Forklift Certified
" = All Forklift Certified employees across all locations
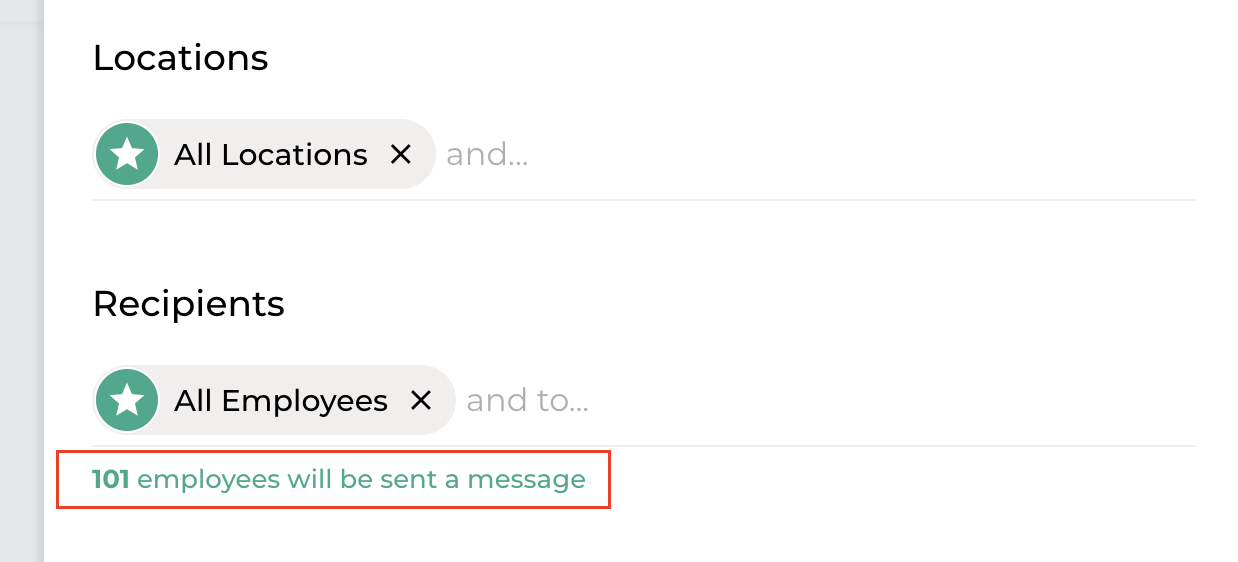
Viewing Message Recipients before Sending
Before sending any message, you can review exactly who will receive it:
Detailed Recipients Modal
Click on the recipient count to open a detailed view showing:
What You'll See:
Complete list of all employees who will receive the message
Employee details: Name, department, and phone number for each recipient
Search functionality to quickly find specific employees
Selection controls to exclude specific individuals if needed
Excluding Recipients:
Uncheck individuals you don't want to include
Search and filter to quickly find employees to exclude
Confirm changes to update the recipient list
The main form will update to reflect your exclusions
Example Workflow:
Select "All Locations" and "Warehouse" Department
System shows "101 employees will be sent a message" below the recipients field.
Click on "101 employees will be sent a message" to open detailed view
Review the list of 101 warehouse employees
Uncheck 3 employees who are on vacation
Confirm - now shows "98 of 101 employees will be sent a message"
Important: Since Yourco utilizes SMS under the hood, all messages sent are final and cannot be undone.
Support
For additional help with messaging in Yourco, reach out to support@yourco.io.
This guide covers the core messaging functionality in Yourco. Features may vary based on your organization's plan and configuration.